2024/11/28

How to Solve VXDIAG BMW Error ISTA-P Not Found?

Problem:

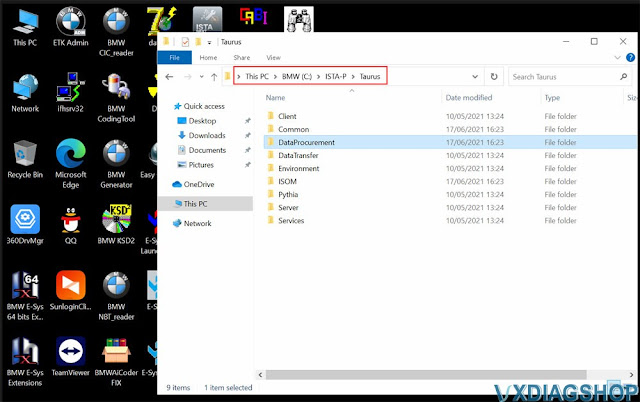
Failed to run ISTA-P software from VXDIAG VCX SE BMW 1TB solid drive. It says error ISTA-P not found. Use manual search instead.

VXDIAG BMW Error ISTA-P Not Found 1

VXDIAG BMW Error ISTA-P Not Found 2

Solution:

Missing DataProcurement files.

Contact www.vxdiagshop.com customer service to download 2 data files.

VXDIAG BMW Error ISTA-P Not Found 3

Extract both files.

Copy and replace files in this folder:

C://BMW/ISTA-P

VXDIAG BMW Error ISTA-P Not Found 4

VXDIAG BMW Error ISTA-P Not Found 5

2024/11/27

Honda HDS No VXDIAG Device Selection Solution

Problem:

Got the VXDIAG VCX SE Honda HDS 3.105.012 software installed. Run software but didn’t see the VXDIAG communication interface selection.

Honda HDS No VXDIAG Device Selection 1

Solution:

You have installed the wrong driver.

Install Honda driver in VX Manager, and follow instructions to install Honda HDS (i-HDS) software.

Run i-HDS software on the desktop, you will see device selection option. Select the device type as VXDIAG.

Honda HDS No VXDIAG Device Selection 2

Honda HDS No VXDIAG Device Selection 2

Honda HDS No VXDIAG Device Selection 3

Follow the instructions here to install Honda HDS software

How to Install VXDIAG Honda Software?

2024/11/26

How to Use VXDIAG VCX NANO with Techline Connect [2024 Guide]


How to use the Tech2win diagnostic feature of the ACDelco Techline Connect system?  We have shown some setup instructions (search our blog). Here is the 2024 step-by-step guide on setting up vxdiag vcx nano gm with Techline Connect system.

It is a service that you have to pay for. How to use the paid version?  Many of us cannot get vcx nano to work on the VM Virtual Box virtual machine. Here will show how to install the software on the main portion of the laptop.


First we are going to get the ACDelco Techline Connect software. We'll just open up your browser type in ACDelcoTDS, go log in or register. If you don't have an account you can click Don't have an account and sign up.

Set up VXDIAG VCX NANO GM with Techline Connect  1

If already have one, go to log in.  Scroll down accept the terms and conditions. You can get subscriptions for all the different diagnostic tools.

Any one of these will get you into the TDS software. If you didn't already have a subscription you could click here and add one vehicle.

Set up VXDIAG VCX NANO GM with Techline Connect  2

You'll have to add the VIN for the vehicle but in order to do that first you need the software so if you click on this should bring us up to the page where we can get the software here. We are click on this Download Techline Connect and you should see it start downloading up there.

Set up VXDIAG VCX NANO GM with Techline Connect  3

Set up VXDIAG VCX NANO GM with Techline Connect 4

Take a bit, 9 minutes left. Download is done.  We can go into our downloads folder and click on that file and it should install the software.

Set up VXDIAG VCX NANO GM with Techline Connect 5

Just hit yes it'll do its thing. It's done. We can hit Finish and it's automatically starting up Techline Connect application.

Set up VXDIAG VCX NANO GM with Techline Connect 6

But we need to launch it through the the browser so we'll just close out of this and it's important to not have this launch Techline Connect as admin checked for some reason it doesn't work if you have that box check off so we'll just hit this launch Techline Connect button and hopefully it'll open up again.

Set up VXDIAG VCX NANO GM with Techline Connect 7

We'll probably have to restart this a few times see it's installing some software updates. We will just close out of that.  It's a little bit of a painful process. Now if we close this go back to our admin thing same thing go launch Techline Connect you got to hit yes and you'll see it's in installing updates to all of these software packages here and whenever something like this pops up just keep hitting next or yes or or whatever it takes to get it done for.

Set up VXDIAG VCX NANO GM with Techline Connect 8

We're in so this is where you would connect to the vehicle but the problem is we don't have a j2534 tool yet and that is where we're going to use the VXDIAG VCX Nano GM J2534.

Set up VXDIAG VCX NANO GM with Techline Connect 9

So we'll just close out of this for now and we'll go back to our web browser and open up a new tab. Visit www.vxdiagshop.com and go to the Download page. Download VX Manager.

Set up VXDIAG VCX NANO GM with Techline Connect 10

Then go into your downloads folder and it's a zip file so you got to right click on it Go extract all and and now you're inside the folder you can just click on this and it should install the software for you. We will run VX Manager.

Set up VXDIAG VCX NANO GM with Techline Connect 11
Set up VXDIAG VCX NANO GM with Techline Connect 12

Just hit finish and the software will fire up. There is no device detected because we don't connect vcx nano j2534 yet.

Set up VXDIAG VCX NANO GM with Techline Connect 13

We are going to plug the VCX NANO into the laptop. In the vx manager, click on Re-connect.

It will show up device. Update firmware and license.

Set up VXDIAG VCX NANO GM with Techline Connect 14

Then go to the Diagnostic tab to update Passthru driver.

Set up VXDIAG VCX NANO GM with Techline Connect 15
Set up VXDIAG VCX NANO GM with Techline Connect 16
Set up VXDIAG VCX NANO GM with Techline Connect 17

We can close this and go back to our browser. Plug the vcx nano into the vehicle. We've got the vcx nano plugged into both the laptop and the OBD2 port in the vehicle.

Let's back into vehicle programming software, hit View and Add VIN, launch Techline Connect.

Set up VXDIAG VCX NANO GM with Techline Connect 18
Set up VXDIAG VCX NANO GM with Techline Connect 19

It is loading the SPS Program, we can go select vehicle. Then select the VXDIAG J2534 device. Hit continue.

Set up VXDIAG VCX NANO GM with Techline Connect 20
Set up VXDIAG VCX NANO GM with Techline Connect 21

Now you go into this SPS2 tab over here. Click on that and this is where you can program all your modules.

Set up VXDIAG VCX NANO GM with Techline Connect 22

It's already got the VIN of your vehicle. You could manually enter a VIN or you can detect a new vehicle.

We'll go Next. This is where it finds all the controllers on the vehicle. You can scroll down and see all the different modules. Select the module you need to program. 

Set up VXDIAG VCX NANO GM with Techline Connect 23

There are many programming example on our blog, here is an example.

 https://www.vxdiagshop.com/service/set-up-vxdiag-vcx-nano-gm-with-techline-connect.html

How to Solve VXDIAG VCX NANO GM SPS2 Error E9043?

Problem:

I had a problem setting up vxdiag vcx nano gm scanner with Techline Connect for Volt 2012 SPS2 online programming.  There is no VXDIAG or J2534 VCI device selection. It also reported an error “SPS2 error E9043 The VCI device is currently performing another Techline Connect Task.” when launching Techline Connect.

Error images attached:

VXDIAG VCX NANO GM SPS2 Error E9043 1

VXDIAG VCX NANO GM SPS2 Error E9043 2

Solution:

You forget to install the Passthru driver.

Install Passthru driver in VX Manager. Then you will see VXDIAG device option.

Run VXDIAG installed, change the connection from Auto to USB and select PassThru driver.
Next on Techline Connect, you should see Vxdiag option.

VXDIAG VCX NANO GM SPS2 Error E9043 3
VXDIAG VCX NANO GM SPS2 Error E9043 4

2024/11/24

How to Configure VXDIAG Benz with DTS Monaco 9.02?

How to set up or configure DTS Monaco 9.02 with VXDIAG VCX SE Benz DoIP VCI?


DTS Monaco 9 vxdiag vcx se DOIP connection configuration

VCI Name: VCX_SE (VCX_DoIP if it is a Benz C6 VCI)
Bus System Interface: D-PDU API
D-PDU API Version: Bosch D_PDU_API_Bosch_MTS6532
Module Type: Module_Type_ID_MTS6532
Cable: Bosch_VCI_HD26_TO_J1962_DP_2


Or try this

VCI Name: VCX_SE (VCX_DoIP if it is a Benz C6 VCI)
Bus System Interface: D-PDU API
D-PDU API Version: Bosch D_PDU_API_Bosch_MTS6532
Module Type: Module_Type_ID_MTS6532
Cable: OBD_STDCABLE_ONLY

Same configuration steps goes to DTS 8.16.

Configure DTS Monaco 9.02 for VXDIAG Benz

If there is no MTS6532 option when configuring DTS 9.02 or 8.16, check the solution here:

VXDIAG DTS Monaco 8.16 and 9.02 Config No MTS6532 Solution

2024/11/20

VXDIAG Benz Xentry 2024.03 Authentication Failed Fault C003 Solution

Problem:

One of our customers had a problem accessing Mercedes S class W223 using VXDIAG VCX SE Benz and 2024.03 Xentry software. VX Manager detects VCI. Zenzefi license was activated as well.

Xentry reported an error “Authentication Has Failed”

VXDIAG Benz Xentry 2024.03 Fault Number C003 1

VXDIAG Benz Xentry 2024.03 Fault Number C003 2

Solution:

There is a bug with the Zenzefi certificate of the 2024.03 software version.

Need to replace 2 files to the 2024.03 Xentry to use Zenzefi license.

Contact us to get these files: WHATSAPP: 86-18064450969

1st file:

Copy and paste XD_MB file to ProgramData/Mercedes-Benz/config folder

VXDIAG Benz Xentry 2024.03 Fault Number C003 3

2nd file:

Copy and paste ActiveSetup folder to ProgramFiles (x86)/Mercedes-Benz folder

VXDIAG Benz Xentry 2024.03 Fault Number C003 4

After replacing these files, Zenzefi license can be loaded to 2024.03 Xentry successfully.

If software stuck on this page after replacing files. Try logging in Xentry with user name: 1 and password: 1.

VXDIAG Benz Xentry 2024.03 Fault Number C003 5

https://www.vxdiagshop.com/service/vxdiag-benz-2024-03-authentication-has-failed-solution.html