2023/01/31

VXDIAG 2TB HDD Computer Requirement

What’s the computer requirement of the vxdiag 2TB full brand hard drive?

This is a frequently asked question of our customers.


For the HDD, need to insert to laptop with SATA Port, at least 8gb ram, i7 proccessor, better lenovo laptop.
Use it a system hdd.


The HDD tested ok on laptops LENOVO T410, T440, T440P, X201, Acer ES1-571. Suggest testing on laptops above. Laptops after 2008, but not too new, with SATA port, i5 processor or above, at least 6gb ram.

Tips to set up 2TB HDD:
Prior to disable the original hdd, reboot to the bios, remove UEFI and set the boot to HDD.

2023/01/30

How to Solve VXDIAG Ford VCM USB Communication Error?

Problem:

I had a problem running IDS V128.01 with the vxdiag vcx nano Ford interface. VCI and Ford drivers were installed. Start IDS from patch but scanner has no communication with my Fietsa.

Error:

VCM USB Cable Communication Error

IDS to VCM cable not detected.

vxdiag VCM USB Cable Communication Error

Solution:

Always keep your vx manager version up to date. 

1.Update VCI and DoIP firmware in vx manager

2. Uninstall Ford IDS driver and reinstall again.

vxdiag VCM USB Cable Communication Error solution 1

Run IDS from patch. It works fine.

vxdiag VCM USB Cable Communication Error solution 2

VXDIAG GM Win7 32bit Setup Review for GMC Sierra

You will find no cheaper alternative compatible with Tech2Win. Rest assured, if you install it exactly as described below you will find success – in fact, I just completed an automatic ABS bleed today with my GMC Sierra 2500HD!


Disclaimer:
As indicated by others, viruses and hidden software may lurk in the required files. However, my own scan with Kapersky did not flag any. Regardless, it is recommended to perform a fresh OS install on spare/burner PC for three reasons:
1) No personal files or info to worry about
2) Windows 7 Professional 32-Bit is required. If you don’t already have it, you will need to get it and perform a fresh install. There are many documented failures from attempting to use Windows 10, Win 7 64-bit, etc -I prefer Win7.
3) Lastly if you think you can get away with running Windows 7 Pro 32-bit inside a Virtual Machine, think again – Tech2Win will crash while establishing vehicle connection (ask me how I know).


Okay, on to the guide…

1) Perform fresh install of Windows 7 Professional 32-bit (x86).
2) Install drivers on your machine and all that good stuff.
3) Fully update windows via Windows Updates (skipping this step may result in cryptic “missing .dll”
errors during install).
4) Install Microsoft Visual C++ Redistributable 2010 to avoid more .dll errors.
5) From VXdiagshop.com, download the latest versions of the following (do NOT use the USB key):
-VX Manager
-VXDIAG GM GDS2
-VXDIAG GM Tech2Win
6) Unzip/extract as necessary. Inside the Tech2Win folder, run AutoInstall.exe.
7) Inside the GDS2 folder, run AutoInstall.exe. Expect long wait times. Note that GDS2 may not strictly be required for Tech2Win but I installed it anyways.
8) Install VX Manager – select PassThru & GM.
9) Plug in VCX Nano GM. Windows will automatically find and install the USB driver as long as step (8) has
been completed
10) Launch VX Manager. VCX Nano should now be recognized. If not, unplug and re-plug back in, restart VX manager, restart the computer, etc. It will show up eventually. Note that an OBD connection is not required at this time.
11) Go to Diagnostic tab at top. Double click “GM GDS2/T2W” and hit Install. Do the same to PassThru if it doesn’t already have a green checkmark.
12) Plug in to your vehicle.
13) Launch Tech2Win with VX Manager still open in the background. Tech2Win It should prompt you to select your communication tool in a popup window – pick GM MDI (not MDI 2). It should then pause and prompt you again, this time with one option – a string of numbers and “USB”. If it does not prompt twice, close Tech2Win and try again.
14) Hit OK at the second prompt. That’s it – Tech2 emulation is running and you should be able to communicate with your vehicle.

VXDIAG GM Win7 32bit Setup Review for GMC Sierra

I’ve had fairly good luck pulling data and performing special functions with this since I got it working.

Good luck to you – hope the guide was helpful.

2023/01/29

VXDIAG 2TB HDD Web Browser in Chinese Solution

Problem:

I got the VXDIAG 2TB HDD for full brands. But all my web browsers turn to Chinese language. How do you get rid of it?


Solution:

1. Click on “” setting icon on the right top of the browser.
2. Select Settings

VXDIAG 2TB HDD Web Browser in Chinese Solution 1

3. Go to language setting (Time & Language)

VXDIAG 2TB HDD Web Browser in Chinese Solution 2

4. Select English and display Microsoft Edge in this language.

Save setting.

VXDIAG 2TB HDD Web Browser in Chinese Solution 3

2023/01/28

VXDIAG 2014 GMC Sierra ECM Programming Review

January 2023 new user review of vxdiag vcx nano for gm.

Worked great for GM SPS / Techline Connect programming.

This little device saved me a bundle. I had a job replacing a 6L80E transmission in a 2014 GMC Sierra. Instructions that came with the reman transmission stated the TCM/ECM needed to be updated together with most recent calibration and suggested towing the vehicle to the dealer. A tow plus dealer programming charge would have been several hundred at the very least. No thanks. Did a bit of research and a lot of folks recommended this little jewel.

It was very easy– install VX Manager, and choose the “J2534 Pass-thru driver” only. For SPS programming, you don’t want all the other stuff. No viruses were detected when installing just that feature. I used a Windows 11 Pro 64 bit desktop computer. After VX Manager is installed, it will show you the device status, and you can update the VCX Nano firmware if you wish.

Once GM Techline Connect was installed, it recognized the VCX Nano right away and it was one of the module options when I got into the SPS programming. Paid GM $45 plus tax for the 2-year VIN subscription, and away it went. Updated the ECM/TCM like I was supposed to and all other modules that had fixes/updates. It performed flawlessly and truck / new transmission works great.

I can’t comment on the GDS2 / Tech2 functionality of this unit, as I have an expensive scanner that does everything but J2534 Pass-thru. I might play with it someday, but I bought this purely for SPS programming and it was easy. It was also my first time using GM SPS/techline or programming a GM module if that says anything.

2023/01/13

GM Tech2Win Menu Selection Insstruction

Off-topic: Here is the instruction for GM Tech2Win/Tech2 menu selection for newbies.


1.Background

GM is the world’s biggest car manufacturer and their cars are sold under dozens of brand name, and each of them includes various models.
It is well known that the cars sold with the different model name tags under different brand names strategically share the platforms and the control systems with others.
The Vehicle Identification Number(VIN) includes clear information about the similarity or compatibility between the different models and brands.
Distinguishing the cars by the model names is for the customers, and identifying the cars by the system genealogy is for the technician.
Without having to scrolling the menu of a few steps up and down for selection, you can simply make the complete and precise selection just by checking the specific positions of the VIN and selecting the corresponding alphabet or number in the menu.


2. The VIN

What is VIN?
In the early 1980’s the U.S. Dept. of Transport required that all road vehicles must contain a 17 character VIN. This established the fixed VIN system for major vehicle manufacturers not to mention GM as it is known today.
Thus, establishing a unique “DNA” style ID number for each unique vehicle which rolled off the assembly line.
Where to find the VIN?
The location of the Vehicle Identification Number may vary on the year/make/model of vehicle, but some common area’s do exist.
Most common area’s of VIN:
– Left instrumentation/dash plate by window (windshield)
– Drivers door or post
– Firewall


3. How to decode VIN

VIN consists of 17 characters, and each of them identifies the characteristics of the vehicle.
1st character
Identifies the country in which the vehicle was manufactured.
For example: U.S.A.(1or4), Canada(2), Mexico(3), Japan(J), Korea(K), England(S), Germany(W), Italy(Z), etc.
2nd character
Identifies the manufacturer. For example; Audi(A), BMW(B), Buick(4), Cadillac(6), Chevrolet(1), Chrysler(C), Dodge(B), Ford(F), GM
Canada(7), General Motors(G), Honda(H), Jaguar(A), Lincoln(L), Mercedes Benz(D), Mercury(M), Nissan(N), Oldsmobile(3), Pontiac(2or5),
Plymouth(P), Saturn(8), Toyota(T), VW(V), Volvo(V).
3rd character
– Identifies vehicle type or manufacturing division.
4th to 8th characters
Identifies vehicle features such as body style, engine type, model, series, etc.
Passenger Car
4th position identifies the Product Line
8th position identifies the Engine Type
Light Duty truck, MPV, Incomplete, Medium Duty Truck
5th position identifies the Product Line
8th position identifies the Engine Type
9th character
Identifies VIN accuracy as check digit.
10th character
Identifies the model year.
For example: 1993(P), 1994(R), 1995(S), 1996(T), 1997(V), 1998(W), 1999(X), 2000(Y), 2001(1), 2002(2), 2003(3), 2004(4), 2005(5)
11th character
– Identifies the assembly plant for the vehicle.
12th to 17th characters
– Identifies the sequence of the vehicle for production as it rolled of the manufacturers assembly line.


4. Menu Selection Example 1

A passenger car with the VIN 1G1YY12SX35134191
Check the characters on the 4th, 8th and 10th position. Each character identifies:
10th position : (3) Manufactured Year (2003)
8th position: (S) Engine Type – Used for the POWERTRAIN system diagnosis
4th position: (Y) Product Line (group) – Used for the BODY and CHASSIS systems diagnosis
Menu selections for POWERTRAIN system diagnosis
Select the model year ? referring to the 10th character

GM Tech2Win Menu Selection 1

Menu selections for BODY system diagnosis
Repeat the first two selections for model year and vehicle type.

GM Tech2Win Menu Selection 2

5. Menu Selection Example 2

A Light Duty Truck with the VIN 1GNDS13S032355104
Check the characters on the 5th, 8th and 10th position
Each character identifies:
10th position : (3) Manufactured Year (2003)
8th position: (S) Engine Type – Used for the POWERTRAIN system diagnosis
5th position: (S) Product Line (group) – Used for the BODY and CHASSIS systems diagnosis
Just select the menu referring to the VIN characters on the specific positions.
IMPORTANT
To identify the Product Line(group) that is used for BODY and CHASSIS system test, refer to the 4th character for the passenger cars, and 5th
character for the other types such as trucks and MPVs.


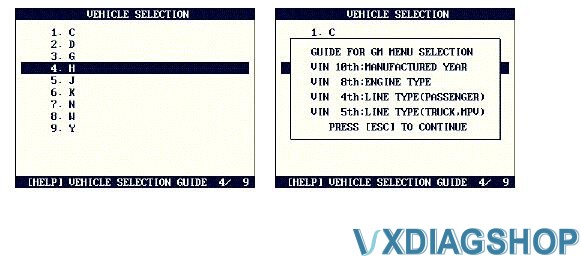
6. On-screen Guidance

You do not have to memorize all these rules.
The instruction is provided on the screen of the GM Tech2win scan tool when you press the [HELP] key.

  GM Tech2Win Menu Selection 3

www.vxdiagshop.com

2023/01/11

VXDIAG Full JLR DoIP “License Invalid” Solution

Problem:

I just received the vxdiag vcx se with full license. Got the firmware and license updated. When trying to update JLR DoIP driver, it failed me and says the license invalid, update vci.

VXDIAG Full JLR DoIP “License Invalid” Solution 1

VXDIAG Full JLR DoIP “License Invalid” Solution 2

Solution:

If get the vcx se full with 2TB HDD, it does not include the JLR DoIP license.

Go to “Licenses” function and check available licenses.

As you can see, JLR DoIP license is not included.  JLR license (SDD only) is different from JLR DoIP license (Pathfinder).

VXDIAG Full JLR DoIP “License Invalid” Solution 3

JLR DoIP and Porsche PIWIS3 licenses require to be purchased separately.

JLR DoIP license

Porsche piwis3 license

2023/01/10

VXDIAG JLR SDD “Network Connection Not Detected” Solution

Problem:

I need help with VXDIAG VCX NANO JLR SDD. It asks me password and user I put them but I can’t enter. Error “Network connection not detected“.

VXDIAG JLR SDD “Network Connection Not Detected 1

VXDIAG JLR SDD “Network Connection Not Detected 2

Solution:

Solved. Leave you a step-by-step of the start of the session.

1. Install JLR.Sdd.offline
2. Do login: user: y-cai1 pass: apri12012
3. Install JLR.sdd.offline.fix.2020.7.14 (patch)
Download software and patch here